Spring @Value Annotation
Spring @Value annotation is used to assign default values to variables and method arguments. We can read spring environment variables as well as system variables using @Value annotation. Spring @Value annotation also supports SpEL. Let’s look at some of the examples of using @Value annotation.
Spring @Value – Default Value
We can assign default value to a class property using @Value annotation.
@Value("Default DBConfiguration")
    private String defaultName;
    @Value annotation argument can be a string only, but spring tries to convert it to the specified type. Below code will work fine and assign the boolean and integer values to the variable.

    @Value("true")
    private boolean defaultBoolean;

    @Value("10")
    private int defaultInt;
Spring @Value – Spring Environment Property
@Value("${APP_NAME_NOT_FOUND}")
    private String defaultAppName;
If the key is not found in the spring environment properties, then the property value will be ${APP_NAME_NOT_FOUND}. We can assign a default value that will get assigned if the key is missing from spring environment properties.
@Value("${APP_NAME_NOT_FOUND:Default}")
    private String defaultAppName;
Spring @Value – System Environment
When Spring environment is populated, it reads all the system environment variables and stores it as properties. So we can assign system variables too using @Value annotation.
@Value("${java.home}")
    private String javaHome;

    @Value("${HOME}")
    private String homeDir;
Spring @Value – SpEL
We can also use Spring Expression Language with @Value annotation. So we can read java home system property using SpEL too.
@Value("#{systemProperties['java.home']}")
    private String javaHome;
Spring @Value with methods
When the @Value annotation is found on a method, Spring context will invoke it when all the spring configurations and beans are getting loaded. If the method has multiple arguments, then every argument value is mapped from the method annotation. If we want different values for different arguments then we can use @Value annotation directly with the argument.
@Value("Test")
    public void printValues(String s, String v){} //both 's' and 'v' values will be 'Test'
    @Value("Test")
    public void printValues(String s, @Value("Data") String v){}
    // s=Test, v=Data
Spring @Value Example
Let’s create a simple Spring application where we will use @Value annotation to read properties and assign them to class variables. Create a maven project and add spring core dependencies.
<dependency>
    <groupId>org.springframework</groupId>
    <artifactId>spring-context</artifactId>
    <version>5.0.6.RELEASE</version>
    </dependency>
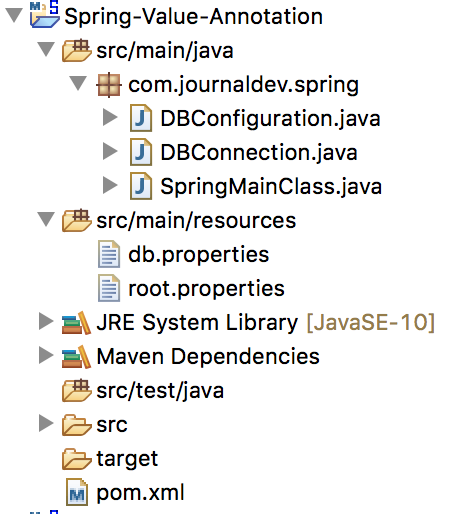
Our final project structure will look like below image, we will look each of the components one by one.

Create a component class where we will inject variable values through @Value annotation.
package com.journaldev.spring;

    import org.springframework.beans.factory.annotation.Value;

    public class DBConnection {

    @Value("${DB_DRIVER_CLASS}")
    private String driverClass;
    @Value("${DB_URL}")
    private String dbURL;
    @Value("${DB_USERNAME}")
    private String userName;
    @Value("${DB_PASSWORD}")
    private char[] password;

    public DBConnection() {
    }

    public void printDBConfigs() {
    System.out.println("Driver Class = " + driverClass);
    System.out.println("DB URL = " + dbURL);
    System.out.println("User Name = " + userName);

    // Never do below in production environment :D
    System.out.println("Password = " + String.valueOf(password));
    }
    }
Now we have to create a Configuration class and provide a @Bean method for DBConnection class.
package com.journaldev.spring;

    import org.springframework.beans.factory.annotation.Value;
    import org.springframework.context.annotation.Bean;
    import org.springframework.context.annotation.Configuration;
    import org.springframework.context.annotation.PropertySource;

    @Configuration
    @PropertySource("classpath:db.properties")
    @PropertySource(value = "classpath:root.properties", ignoreResourceNotFound = true)
    public class DBConfiguration {

    @Value("Default DBConfiguration")
    private String defaultName;

    @Value("true")
    private boolean defaultBoolean;

    @Value("10")
    private int defaultInt;

    @Value("${APP_NAME_NOT_FOUND:Default}")
    private String defaultAppName;

    @Value("${java.home}")
    private String javaHome;

    @Value("${HOME}")
    private String homeDir;

    @Bean
    public DBConnection getDBConnection() {
    DBConnection dbConnection = new DBConnection();
    return dbConnection;
    }

    @Value("Test")
    public void printValues(String s, @Value("another variable") String v) {
    System.out.println("Input Argument 1 =" + s);
    System.out.println("Input Argument 2 =" + v);

    System.out.println("Home Directory = " + homeDir);
    System.out.println("Default Configuration Name = " + defaultName);
    System.out.println("Default App Name = " + defaultAppName);
    System.out.println("Java Home = " + javaHome);
    System.out.println("Boolean = " + defaultBoolean);
    System.out.println("Int = " + defaultInt);

    }
Here is our main class where we are creating annotation-based spring context.
package com.journaldev.spring;

    import java.sql.SQLException;

    import org.springframework.context.annotation.AnnotationConfigApplicationContext;

    public class SpringMainClass {

    public static void main(String[] args) throws SQLException {
    AnnotationConfigApplicationContext context = new AnnotationConfigApplicationContext();
    context.scan("com.journaldev.spring");
    context.refresh();
    System.out.println("Refreshing the spring context");
    DBConnection dbConnection = context.getBean(DBConnection.class);

    dbConnection.printDBConfigs();

    // close the spring context
    context.close();
    }
    }
When you will run the class, it will produce following output.
        Input Argument 1 = Test
        Input Argument 2 = another variable
        Home Directory = /Users/pankaj
        Default Configuration Name = Default DBConfiguration
        Default App Name = Default
        Java Home = /Library/Java/JavaVirtualMachines/jdk-10.0.1.jdk/Contents/Home
        Boolean = true
        Int = 10
        Refreshing the spring context
        Driver Class = com.mysql.jdbc.Driver
        DB URL = jdbc:mysql://localhost:3306/Test
        User Name = journaldev
        Password = journaldev
Notice that Configuration class printValues() is getting called before our context is ready to serve user requests. That’s all for Spring @Value annotation example, you can download the example code from our GitHub Repository – A Comprehensive Guide.


