Welcome to the Spring DataSource JNDI Tomcat Example Tutorial
Earlier we saw how to implement database operations using Spring JDBC integration. However most of the time enterprise applications are deployed in a servlet container such as Tomcat, JBoss etc.
Spring DataSource JNDI Tomcat
We know that DataSource with JNDI is the preferred way to achieve connection pooling and get benefits of container implementations. Today we will look how we can configure a Spring Web Application to use JNDI connections provided by Tomcat. For my example, I will use MySQL database server and create a simple table with some rows. We will create a Spring Rest web service that will return the JSON response with list of all the data in the table.
Database Setup
CREATE TABLE `Employee` (
  `id` int(11) unsigned NOT NULL,
  `name` varchar(20) DEFAULT NULL,
  `role` varchar(20) DEFAULT NULL,
  PRIMARY KEY (`id`)
) ENGINE=InnoDB DEFAULT CHARSET=utf8;

INSERT INTO `Employee` (`id`, `name`, `role`)
VALUES
    (1, 'Pankaj', 'CEO'),
    (2, 'David', 'Manager');
commit;
Spring DataSource MVC Project
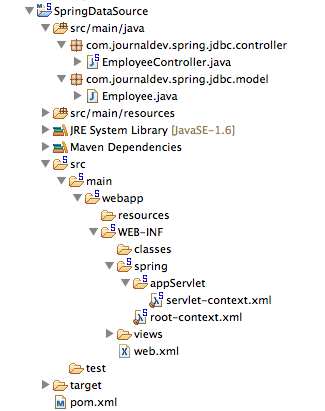
Create a Spring MVC Project in the Spring Tool Suite so that our spring application skeleton code is ready. Once we will be done with our implementation, our project structure will look like below image.
 Spring JDBC and Jackson Dependencies
We will have to add Spring JDBC, Jackson and MySQL Database driver as the dependencies in the pom.xml file. My final pom.xml file looks like below.
<?xml version="1.0" encoding="UTF-8"?>
<project xmlns="https://maven.apache.org/POM/4.0.0" xmlns:xsi="https://www.w3.org/2001/XMLSchema-instance"
    xsi:schemaLocation="https://maven.apache.org/POM/4.0.0 https://maven.apache.org/maven-v4_0_0.xsd">
    <modelVersion>4.0.0</modelVersion>
    <groupId>com.journaldev.spring</groupId>
    <artifactId>SpringDataSource</artifactId>
    <name>SpringDataSource</name>
    <packaging>war</packaging>
    <version>1.0.0-BUILD-SNAPSHOT</version>
    <properties>
        <java-version>1.6</java-version>
        <org.springframework-version>4.0.2.RELEASE</org.springframework-version>
        <org.aspectj-version>1.7.4</org.aspectj-version>
        <org.slf4j-version>1.7.5</org.slf4j-version>
        <jackson.databind-version>2.2.3</jackson.databind-version>
    </properties>
    <dependencies>

        <dependency>
            <groupId>org.springframework</groupId>
            <artifactId>spring-jdbc</artifactId>
            <version>${org.springframework-version}</version>
        </dependency>


        <dependency>
            <groupId>mysql</groupId>
            <artifactId>mysql-connector-java</artifactId>
            <version>5.0.5</version>
        </dependency>

        <dependency>
            <groupId>com.fasterxml.jackson.core</groupId>
            <artifactId>jackson-databind</artifactId>
            <version>${jackson.databind-version}</version>
        </dependency>

        <dependency>
            <groupId>org.springframework</groupId>
            <artifactId>spring-context</artifactId>
            <version>${org.springframework-version}</version>
            <exclusions>

                <exclusion>
                    <groupId>commons-logging</groupId>
                    <artifactId>commons-logging</artifactId>
                 </exclusion>
            </exclusions>
        </dependency>
        <dependency>
            <groupId>org.springframework</groupId>
            <artifactId>spring-webmvc</artifactId>
            <version>${org.springframework-version}</version>
        </dependency>


        <dependency>
            <groupId>org.aspectj</groupId>
            <artifactId>aspectjrt</artifactId>
            <version>${org.aspectj-version}</version>
        </dependency>


        <dependency>
            <groupId>org.slf4j</groupId>
            <artifactId>slf4j-api</artifactId>
            <version>${org.slf4j-version}</version>
        </dependency>
        <dependency>
            <groupId>org.slf4j</groupId>
            <artifactId>jcl-over-slf4j</artifactId>
            <version>${org.slf4j-version}</version>
            <scope>runtime</scope>
        </dependency>
        <dependency>
            <groupId>org.slf4j</groupId>
            <artifactId>slf4j-log4j12</artifactId>
            <version>${org.slf4j-version}</version>
            <scope>runtime</scope>
        </dependency>
        <dependency>
            <groupId>log4j</groupId>
            <artifactId>log4j</artifactId>
            <version>1.2.15</version>
            <exclusions>
                <exclusion>
                    <groupId>javax.mail</groupId>
                    <artifactId>mail</artifactId>
                </exclusion>
                <exclusion>
                    <groupId>javax.jms</groupId>
                    <artifactId>jms</artifactId>
                </exclusion>
                <exclusion>
                    <groupId>com.sun.jdmk</groupId>
                    <artifactId>jmxtools</artifactId>
                </exclusion>
                <exclusion>
                    <groupId>com.sun.jmx</groupId>
                    <artifactId>jmxri</artifactId>
                </exclusion>
            </exclusions>
            <scope>runtime</scope>
        </dependency>


        <dependency>
            <groupId>javax.inject</groupId>
            <artifactId>javax.inject</artifactId>
            <version>1</version>
        </dependency>


        <dependency>
            <groupId>javax.servlet</groupId>
            <artifactId>servlet-api</artifactId>
            <version>2.5</version>
            <scope>provided</scope>
        </dependency>
        <dependency>
            <groupId>javax.servlet.jsp</groupId>
            <artifactId>jsp-api</artifactId>
            <version>2.1</version>
            <scope>provided</scope>
        </dependency>
        <dependency>
            <groupId>javax.servlet</groupId>
            <artifactId>jstl</artifactId>
            <version>1.2</version>
        </dependency>


        <dependency>
            <groupId>junit</groupId>
            <artifactId>junit</artifactId>
            <version>4.7</version>
            <scope>test</scope>
        </dependency>
    </dependencies>
    <build>
        <plugins>
            <plugin>
                <artifactId>maven-eclipse-plugin</artifactId>
                <version>2.9</version>
                <configuration>
                    <additionalProjectnatures>
                        <projectnature>org.springframework.ide.eclipse.core.springnature</projectnature>
                    </additionalProjectnatures>
                    <additionalBuildcommands>
                        <buildcommand>org.springframework.ide.eclipse.core.springbuilder</buildcommand>
                    </additionalBuildcommands>
                    <downloadSources>true</downloadSources>
                    <downloadJavadocs>true</downloadJavadocs>
                </configuration>
            </plugin>
            <plugin>
                <groupId>org.apache.maven.plugins</groupId>
                <artifactId>maven-compiler-plugin</artifactId>
                <version>2.5.1</version>
                <configuration>
                    <source>1.6</source>
                    <target>1.6</target>
                    <compilerArgument>-Xlint:all</compilerArgument>
                    <showWarnings>true</showWarnings>
                    <showDeprecation>true</showDeprecation>
                </configuration>
            </plugin>
            <plugin>
                <groupId>org.codehaus.mojo</groupId>
                <artifactId>exec-maven-plugin</artifactId>
                <version>1.2.1</version>
                <configuration>
                    <mainClass>org.test.int1.Main</mainClass>
                </configuration>
            </plugin>
        </plugins>
    </build>
</project>
If you are not familiar with Rest in Spring, please read Spring Restful Webservice Example.
Model Class
Our Employee bean that is modeled after Employee table, looks like below.
package com.journaldev.spring.jdbc.model;

import java.io.Serializable;

public class Employee implements Serializable{

    private static final long serialVersionUID = -7788619177798333712L;

    private int id;
    private String name;
    private String role;

    public int getId() {
        return id;
    }
    public void setId(int id) {
        this.id = id;
    }
    public String getName() {
        return name;
    }
    public void setName(String name) {
        this.name = name;
    }

    public String getRole() {
        return role;
    }
    public void setRole(String role) {
        this.role = role;
    }


}
Spring Controller Class
Our simple controller class looks like below.
package com.journaldev.spring.jdbc.controller;

import java.util.ArrayList;
import java.util.List;
import java.util.Map;

import javax.sql.DataSource;

import org.slf4j.Logger;
import org.slf4j.LoggerFactory;
import org.springframework.beans.factory.annotation.Autowired;
import org.springframework.beans.factory.annotation.Autowired;
import org.springframework.beans.factory.annotation.Qualifier;
import org.springframework.jdbc.core.JdbcTemplate;
import org.springframework.stereotype.Controller;
import org.springframework.web.bind.annotation.RequestMapping;
import org.springframework.web.bind.annotation.RequestMethod;
import org.springframework.web.bind.annotation.ResponseBody;

import com.journaldev.spring.jdbc.model.Employee;

/**
 * Handles requests for the Employee JDBC Service.
 */
@Controller
public class EmployeeController {

    private static final Logger logger = LoggerFactory.getLogger(EmployeeController.class);

    @Autowired
    @Qualifier("dbDataSource")
    private DataSource dataSource;

    public void setDataSource(DataSource dataSource) {
        this.dataSource = dataSource;
    }

    @RequestMapping(value = "/rest/emps", method = RequestMethod.GET)
    public @ResponseBody List getAllEmployees() {
        logger.info("Start getAllEmployees.");
        List empList = new ArrayList();
        //JDBC Code - Start
        String query = "select id, name, role from Employee";
        JdbcTemplate jdbcTemplate = new JdbcTemplate(dataSource);

        List<Map<String,Object>> empRows = jdbcTemplate.queryForList(query);

        for(Map<String,Object> empRow : empRows){
            Employee emp = new Employee();
            emp.setId(Integer.parseInt(String.valueOf(empRow.get("id"))));
            emp.setName(String.valueOf(empRow.get("name")));
            emp.setRole(String.valueOf(empRow.get("role")));
            empList.add(emp);
        }

        return empList;
    }

}
Important Points about the Controller class
- DataSource will be wired by Spring Bean configuration with name dbDataSource.
- We are using JdbcTemplate to avoid common errors such as resource leak and remove JDBC boiler plate code.
- URI to retrieve the list of Employee will be https://{host}:{port}/SpringDataSource/rest/emps
- We are using @ResponseBody to send the list of Employee objects as response, Spring will take care of converting it to JSON.
Spring Bean Configuration
There are two ways through which we can JNDI lookup and wire it to the Controller DataSource, my spring bean configuration file contains both of them but one of them is commented. You can switch between these and the response will be the same.
Using jee namespace tag to perform the JNDI lookup and configure it as a Spring Bean. We also need to include jee namespace and schema definition in this case.
Creating a bean of type org.springframework.jndi.JndiObjectFactoryBean by passing the JNDI context name. jndiName is a required parameter for this configuration.
My spring bean configuration file looks like below.
<?xml version="1.0" encoding="UTF-8"?>
<beans:beans xmlns="https://www.springframework.org/schema/mvc"
    xmlns:jee="https://www.springframework.org/schema/jee"
    xmlns:xsi="https://www.w3.org/2001/XMLSchema-instance" xmlns:beans="https://www.springframework.org/schema/beans"
    xmlns:context="https://www.springframework.org/schema/context"
    xsi:schemaLocation="https://www.springframework.org/schema/jee https://www.springframework.org/schema/jee/spring-jee.xsd
        https://www.springframework.org/schema/mvc https://www.springframework.org/schema/mvc/spring-mvc.xsd
        https://www.springframework.org/schema/beans https://www.springframework.org/schema/beans/spring-beans.xsd
        https://www.springframework.org/schema/context https://www.springframework.org/schema/context/spring-context.xsd">


    <annotation-driven />


    <resources mapping="/resources/**" location="/resources/" />


    <beans:bean class="org.springframework.web.servlet.view.InternalResourceViewResolver">
        <beans:property name="prefix" value="/WEB-INF/views/" />
        <beans:property name="suffix" value=".jsp" />
    </beans:bean>


    <beans:bean class="org.springframework.web.servlet.mvc.method.annotation.RequestMappingHandlerAdapter">
        <beans:property name="messageConverters">
            <beans:list>
                <beans:ref bean="jsonMessageConverter" />
            </beans:list>
        </beans:property>
    </beans:bean>


    <beans:bean id="jsonMessageConverter" class="org.springframework.http.converter.json.MappingJackson2HttpMessageConverter"></beans:bean>


    <beans:bean id="dbDataSource" class="org.springframework.jndi.JndiObjectFactoryBean">
        <beans:property name="jndiName" value="java:comp/env/jdbc/MyLocalDB"/>
    </beans:bean>


    <context:component-scan base-package="com.journaldev.spring.jdbc.controller" />

</beans:beans>
Tomcat DataSource JNDI Configuration
Now that we are done with our project, the final part is to do the JNDI configuration in Tomcat container to create the JNDI resource.
<Resource name="jdbc/TestDB"
      global="jdbc/TestDB"
      auth="Container"
      type="javax.sql.DataSource"
      driverClassName="com.mysql.jdbc.Driver"
      url="jdbc:mysql://localhost:3306/TestDB"
      username="pankaj"
      password="pankaj123"

      maxActive="100"
      maxIdle="20"
      minIdle="5"
      maxWait="10000"/>
Add above configuration in the GlobalNamingResources section of the server.xml file.
<ResourceLink name="jdbc/MyLocalDB"
                global="jdbc/TestDB"
                auth="Container"
                type="javax.sql.DataSource" />
We also need to create the Resource Link to use the JNDI configuration in our application, best way to add it in the server context.xml file. Notice that ResourceLink name should be matching with the JNDI context name we are using in our application. Also make sure MySQL jar is present in the tomcat lib directory, otherwise tomcat will not be able to create the MySQL database connection pool.
Running the Spring DataSource JNDI Sample Project
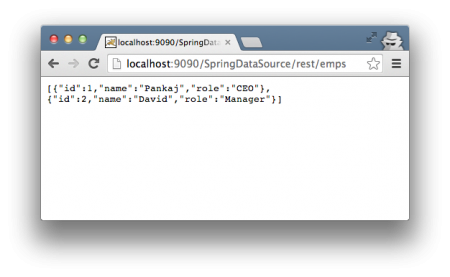
Our project and server configuration is done and we are ready to test it. Export the project as WAR file and place it in the tomcat deployment directory. The JSON response for the Rest call is shown in the below image.


 Spring JDBC and Jackson Dependencies