The Race to Create the Greatest Image Generation Model
The race to create the greatest image generation model continues onward, and it only grows more heated. This year, we have seen the rise of FLUX to replace the total dominance of Stable Diffusion XL in the open source community, seen Ideogram and ReCraft introduce next gen models on the closed source side that blow expectations out of the water, and seen numerous smaller projects break the mold in their own ways across a variety of different sub-tasks.

NVIDIA Sana: A Mold Breaker
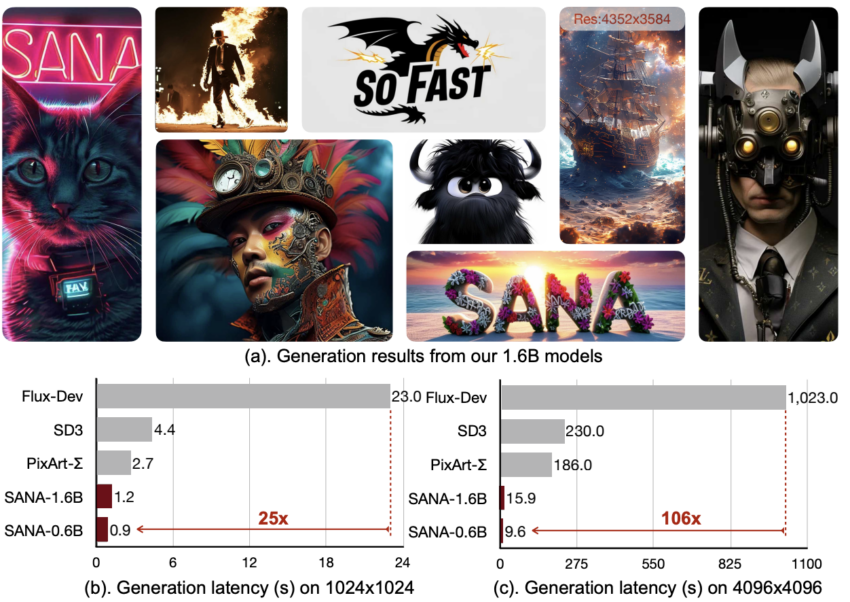
In this article, we want to introduce you to one of those mold breakers that has caught our attention: NVIDIA Sana. This incredibly fast model, while very newly released, offers a plethora of important traits we believe will become standard with subsequent SOTA model releases.
What Makes Sana Different from FLUX and Stable Diffusion?

- Unique deep compression autoencoder design with up to 32x compression.
- Linear attention mechanism in the Diffusion Transformer (DiT), reducing complexity from O(N²) to O(N).
- Replaced the T5 text encoder with the smaller, more efficient Gemma model.
- Training with Flow-DPM-Solver for fewer sampling steps, competing with FLUX at 1/20th size.
Sana Pipeline Breakdown
The Sana Model Architecture: Autoencoder

The Sana Model Architecture: Linear Diffusion Transformer

The Sana Model Architecture: Replacing T5
Sana integrates Google’s Gemma encoder for better human-like input processing using Chain-of-Thought (CoT) and In-Context Learning (ICL).
How to Run Sana on a ccloud³ VM
Install Conda
Install Miniconda to manage the Sana environment:
cd ../home
curl -O https://repo.anaconda.com/miniconda/Miniconda3-latest-Linux-x86_64.sh
bash Miniconda3-latest-Linux-x86_64.sh
Setup Sana Environment
Clone the repository and set up the environment:
git clone https://github.com/NVlabs/Sana.git
cd Sana
./environment_setup.sh sana
conda activate sana
Run Sana in the Web Application
Use the official Gradio app demo to generate images:
DEMO_PORT=15432 \
python3 app/app_sana.py \
  --share \
  --config=configs/sana_config/1024ms/Sana_1600M_img1024.yaml \
  --model_path=hf://Efficient-Large-Model/Sana_1600M_1024px/checkpoints/Sana_1600M_1024px.pth
Run Sana in Jupyter Lab with Python
Another way to run Sana on a ccloud³ VM is through a Jupyter Notebook. First, install Jupyter on your machine. Alternatively, you can use Visual Studio Code on your local machine via SSH.
Install Jupyter Lab
pip3 install jupyterlab
jupyter lab --allow-root
Once installed, create a new iPython Notebook file and paste the following code into the first cell to initialize the Sana pipeline.
Initialize the Sana Pipeline
import torch
from app.sana_pipeline import SanaPipeline
from torchvision.utils import save_image

device = torch.device("cuda:0" if torch.cuda.is_available() else "cpu")
sana = SanaPipeline("configs/sana_config/1024ms/Sana_1600M_img1024.yaml")
sana.from_pretrained("hf://Efficient-Large-Model/Sana_1600M_1024px/checkpoints/Sana_1600M_1024px.pth")
This step initializes the model pipeline and may take a few minutes depending on the HuggingFace cache status. Next, use the code below to generate an image.
Generate an Image with Sana
import random
val = random.randint(0, 100000000)
generator = torch.Generator(device=device).manual_seed(42)

prompt = 'a cyberpunk cat with a neon sign that says "Sana"'

image = sana(
    prompt=prompt,
    height=4096,
    width=4096,
    guidance_scale=5.0,
    pag_guidance_scale=2.0,
    num_inference_steps=40,
    generator=generator,
)
save_image(image, 'sana.png', nrow=1, normalize=True, value_range=(-1, 1))
If successful, this code will generate an image based on the given prompt. You can modify the prompt, height, and guidance_scale values to influence the output.
Run Sana in ComfyUI
Another way to run the Sana model is through the popular ComfyUI. Follow the steps below to set it up.
Install ComfyUI
cd /home
git clone https://github.com/comfyanonymous/ComfyUI.git
cd ComfyUI
git clone https://github.com/Efficient-Large-Model/ComfyUI_ExtraModels.git custom_nodes/ComfyUI_ExtraModels
pip3 install -r requirements.txt
python3 main.py
This will download all necessary files and launch the Web UI. Use an SSH tunnel to access the ComfyUI in your local browser at http://127.0.0.1:8188. Once inside, load the provided JSON configuration file to start generating images.
Conclusion of NVIDIA Sana
Sana is an exciting project pushing the boundaries of state-of-the-art image generation models. Its remarkable speed and efficiency may allow it to rival established models if widely adopted. Kudos to NVIDIA for making this innovative technology open-source!


