
Fooocus: The Latest Stable Diffusion Application
Over the past few weeks, we have witnessed a surge in the popularity of the latest Stable Diffusion application, Fooocus. Fooocus is an image generation software built on Gradio and developed by the renowned open-source creator Illyasviel, who is also responsible for the widely known ControlNet. This tool presents a fresh approach to the image synthesis pipeline, offering an alternative to well-established frameworks like AUTOMATIC1111’s Stable Diffusion Web UI and MidJourney.
Introduction
In this article, we will begin with an overview of the features and capabilities of this new platform. We aim to showcase the distinctions and improvements it provides compared to other tools we have previously discussed on this blog. Additionally, we will make the case for why Fooocus deserves a place in your image synthesis toolkit. After that, we will move on to a demonstration, guiding you through the setup process and how to start generating images. By the end of this guide, readers will have a thorough understanding of the various useful settings and built-in features Fooocus has to offer.
Prerequisites
- GPU Requirements: A powerful GPU is essential (NVIDIA recommended) for quicker rendering. A minimum of 8GB of VRAM is advised to achieve optimal performance.
- Pre-trained Models: Download the necessary pre-trained models (e.g., Stable Diffusion variants) that align with your preferred art style or application.
- Prompt Mastery: Develop the skill of writing highly detailed and descriptive prompts to guide the model in producing precise image outputs.
- Optional AI Upscaling: Enhance final image quality using AI upscaling tools like ESRGAN after generation.
What Does Fooocus Offer to Stable Diffusion Users?
To begin, one of the key advantages of Fooocus is its ability to simplify many of the complex settings typically required to produce high-quality generated images. This is outlined in their technical documentation on GitHub, but let’s examine each of these improvements here.
- Style: The Fooocus V2 style system incorporates MidJourney-like prompt expansion, improving text representation with GPT-2 at minimal computational cost. This feature allows users to input simplified prompts while generating far more diverse and intricate outputs.
- Native Refiner Swapping: Integrated within a single k-sampler, this enables seamless retention of the base model’s parameters while refining the image. This method is also used in the AUTOMATIC1111 Web UI.
- Negative Image Aspect Ratio (ADM) Guidance: The highest resolutions of Stable Diffusion XL lack cross-attention. Fooocus addresses this by modifying positive and negative signals to compensate for the absence of classifier-free guidance, improving high-resolution outputs.
- Self-Attention Guidance: Based on research findings, Fooocus implements a subtle level of Self-Attention Guidance. Alongside negative ADM guidance, this helps counteract the smoothing effect often observed in SD XL image outputs.
- Automatic LoRA Model Application: Fooocus automatically integrates the “sd_xl_offset_example-lora_1.0.safetensors” LoRA model at a strength of 0.1. Their tests have demonstrated that values below 0.5 consistently yield better results than when omitted entirely.
- Optimized Sampler Parameters: The developers have fine-tuned and adjusted the sampler parameters for the best possible output.
- Resolution Adjustments: A fixed resolution setting is implemented based on the ideal aspect ratios for image synthesis with SD XL.
These combined features significantly reduce the level of technical knowledge required to operate the software efficiently. Now that we have covered what makes Fooocus user-friendly, let’s proceed with setting up the UI before weighing its advantages and drawbacks.
Fooocus Demo
Setup
To run the Fooocus demo, we first need to install Conda.
Start by opening the terminal and running the following commands:
wget https://repo.anaconda.com/miniconda/Miniconda3-latest-Linux-x86_64.sh
bash Miniconda3-latest-Linux-x86_64.sh
Follow the on-screen instructions in the terminal, answering “yes” when prompted. Once the installation is complete, close the terminal, reopen it, and proceed with the next steps.
Now, we need to set up the required environment and dependencies:
conda env create -f environment.yaml
conda activate fooocus
pip install -r requirements_versions.txt
These commands install all necessary dependencies to run Fooocus within the Conda environment. Additionally, during the first launch, Fooocus will automatically download a Stable Diffusion XL model from HuggingFace.
Finally, run the following command to start the Fooocus application:
python entry_with_update.py --listen --share
Using the Fooocus Application
Now, we can begin synthesizing new images. This process shares many similarities with familiar Stable Diffusion and MidJourney pipelines but has some key differences in implementation, some of which were covered above.
The first step is to run a quick test of the basic image generation using the default settings. To do this, we simply enter a prompt and hit “Generate.” Fooocus will automatically download a merged model, namely “juggernautXL_version6Rundiffusion.safetensors“, which is capable of handling a wide variety of both realistic and artistic outputs. The Fooocus web UI allows us to view an example generation using the basic input. The default settings generate two images at a resolution of 1152×896 (9:7 ratio), and we can observe the diffusion process in real time.
From here, we can explore various advanced settings in Fooocus by clicking the toggle at the bottom of the screen. The advanced settings will be displayed on the right in organized Gradio tabs.
Performance Settings
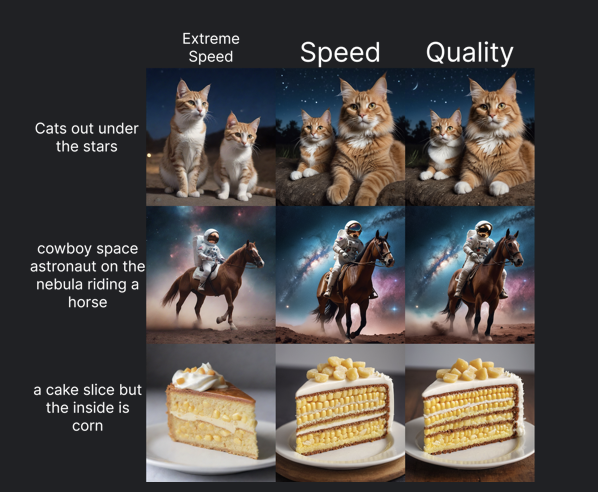
The first and perhaps most important tab is “Settings.” Here, we see one of the key differences from a typical pipeline: the performance settings. These are pre-configured and optimized to run a different number of diffusion steps to achieve varying image qualities at different speeds:
- Speed: 30 steps
- Quality: 60 steps
- Extreme Speed: 8 steps
Although Fooocus appears to support other K samplers, it is hardcoded to use “dpmpp_2m_sde_gpu” for all performance settings.
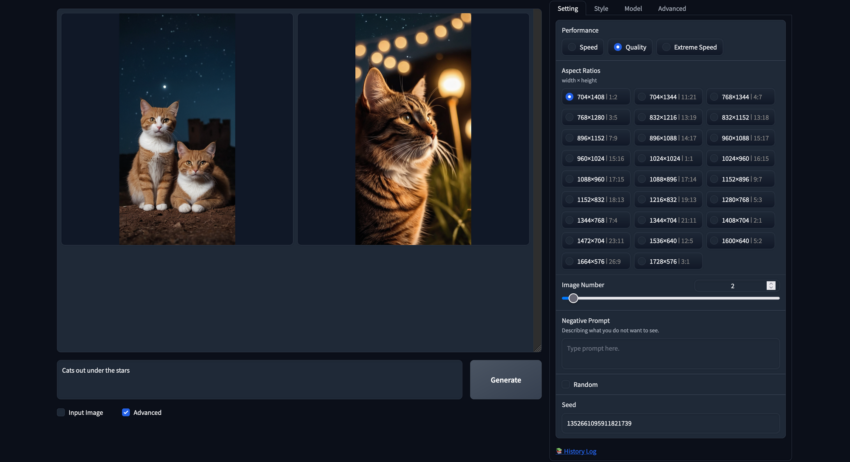
Resolutions
These are optimized resolutions specifically designed for Stable Diffusion XL models. This restriction on image sizing improves output quality, as images generated at non-optimal resolutions are more likely to appear distorted. Below is an example generated at 704×1408 resolution.
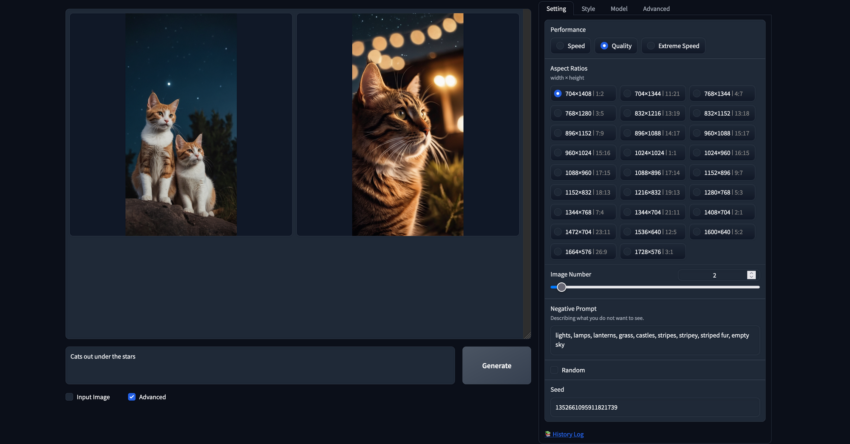
Negative Prompts
The negative prompt functions as an opposite to the regular prompt, and any terms included will be suppressed as much as possible by the model. Negative prompts can be used to remove unwanted traits from generated images or mitigate some common issues Stable Diffusion has with specific objects. In the example below, we used the same seed as the previous generation but added an additional negative prompt to adjust the output.
You can manually assign the seed by disabling the “Random” box below the negative prompt field and entering a value.
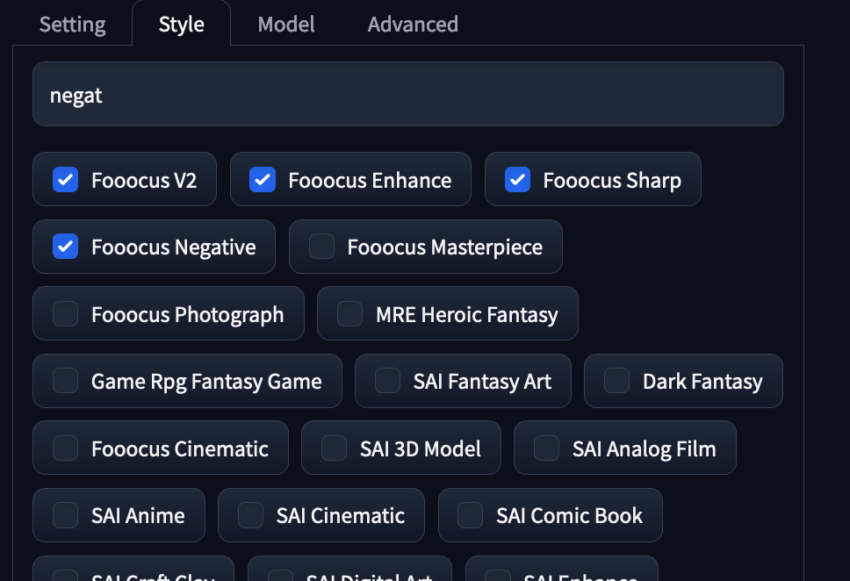
Style Options
The next tab, “Style,” contains GPT-2 enhancements that expand prompts for more dynamic results. Experiment with different styles to observe their impact on the final output. We especially recommend using the preset styles above for all generations.
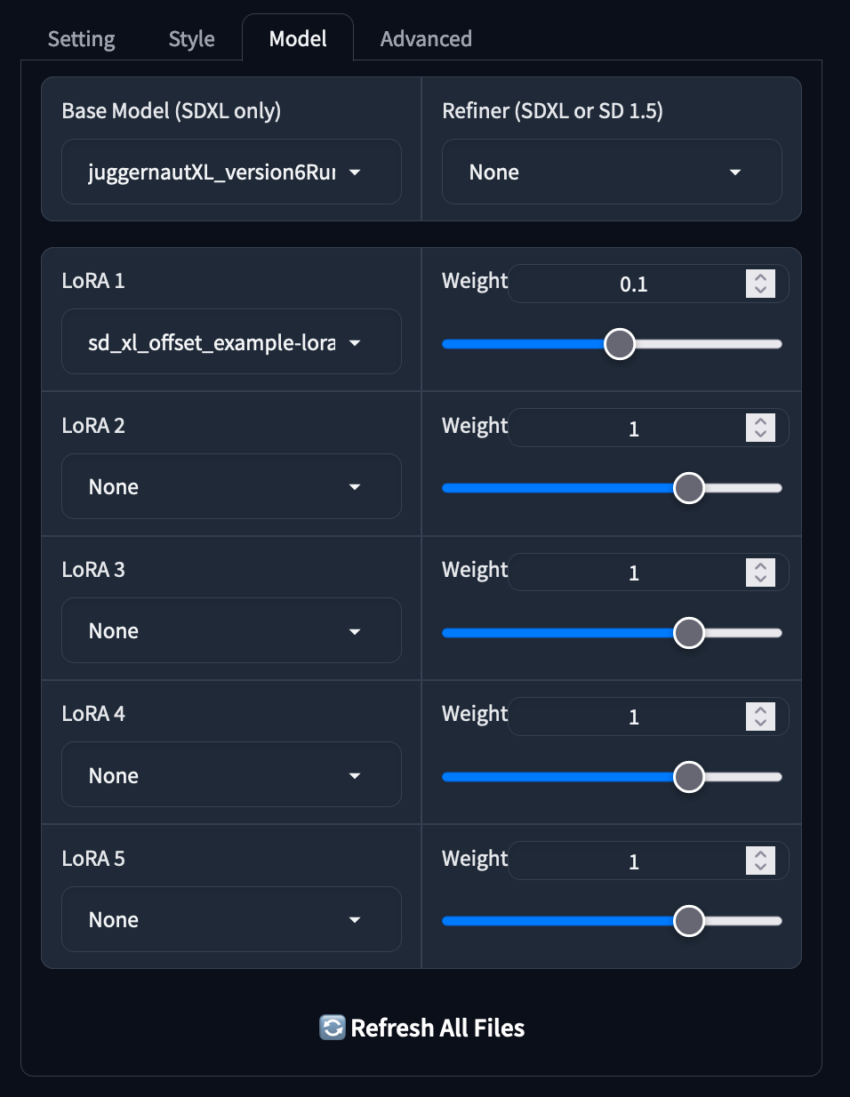
Model Options
The next tab, “Model,” is arguably the most important, as it allows users to switch the main checkpoint and LoRAs (Low-Rank Adaptations). Convenient sliders make it easy to adjust the weight of additional models, allowing for a more intuitive way to blend multiple LoRAs.
Fooocus will automatically download and assign a weight of 0.1 to “sd_xl_offset_example-lora”, which can be removed if desired. If a model is downloaded during a session, clicking the “Refresh all files” button at the bottom will update the available model list.
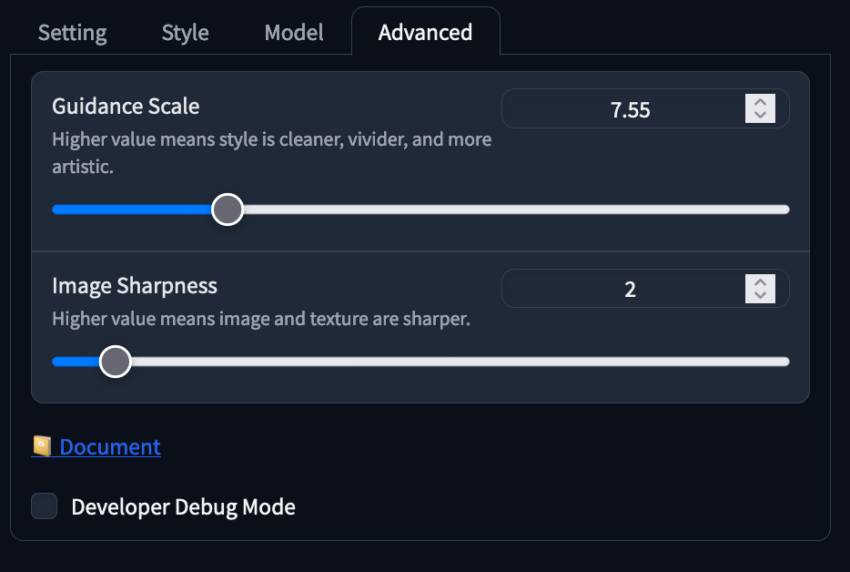
Advanced Settings
The final tab, “Advanced,” includes sliders for Guidance Scale and Image Sharpness:
- Guidance Scale: Controls how much the prompt influences the final image. Best range: 4-10.
- Image Sharpness: Increases sharpness but may introduce an uncanny valley effect if set too high.
Image-to-Image Generation with Fooocus
In addition to the advanced options toggle, there is also an input image toggle beside it. This is how we can perform Image-to-Image generation in Fooocus. Illyasviel, the creator of Fooocus, was also the creator of the popular ControlNet framework. In Fooocus, Image-to-Image has been combined with ControlNet to automatically guide the input generation.
There are three main modes for image manipulation:
Upscaling or Variation
Fooocus offers five settings for variation and upscaling:
- Vary (subtle): Introduces slight changes to the image.
- Vary (strong): Applies more significant variations.
- Upscale (1.5x): Increases resolution by 1.5x.
- Upscale (2x): Doubles the resolution.
- Upscale (fast 2x): Fast upscaling with 2x resolution.
The first two options introduce subtle or strong variations, while the upscaling options enhance image resolution.
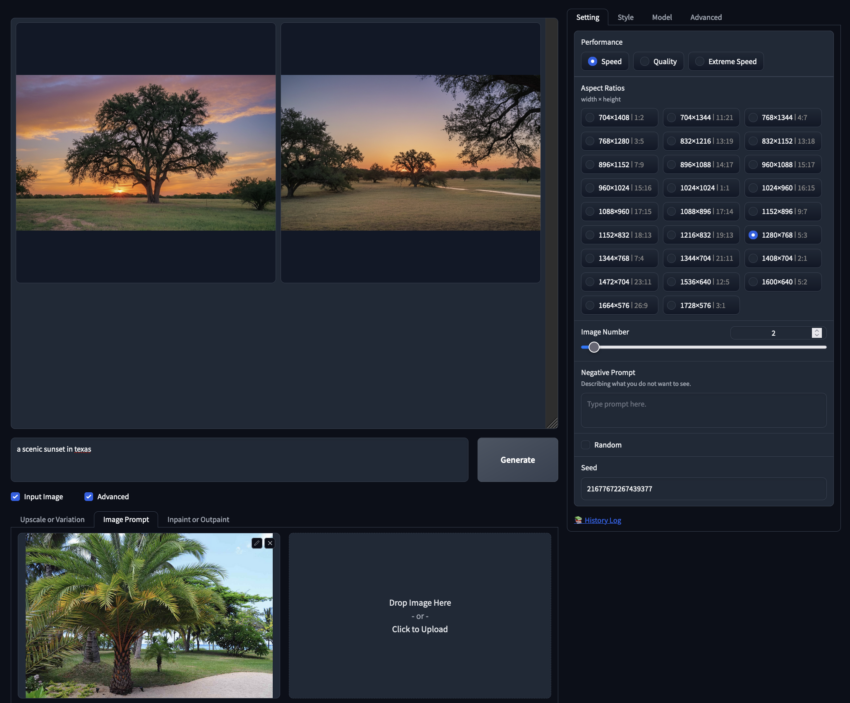
Image Prompting
This feature is similar to traditional Image-to-Image processing in Stable Diffusion but allows multiple input images instead of just one. This capability enables more variation in generated outputs.
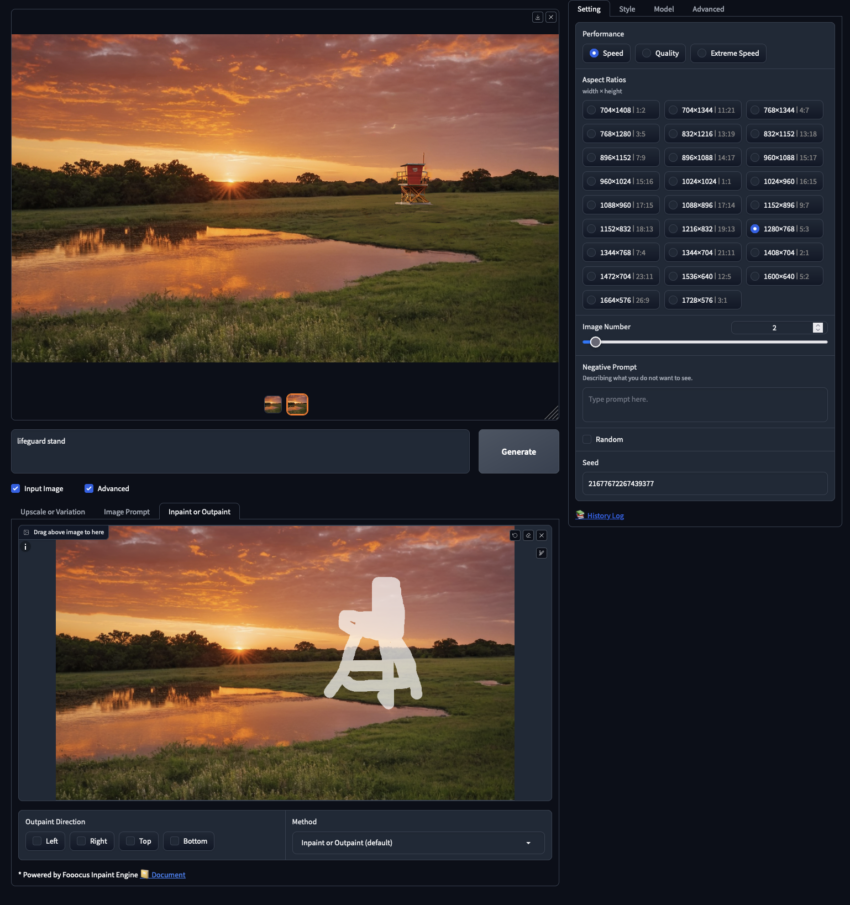
Inpainting and Outpainting
Inpainting allows users to modify or add details within a masked area of an image.
Outpainting extends the image beyond its original boundaries, predicting what would exist outside the original frame.
These tools enable users to add new elements to images, such as placing a lifeguard stand on a beach. Users can combine all three methods for impressive results.
Conclusion
Fooocus provides a wide range of powerful features for image generation, from basic prompts to advanced model blending and Image-to-Image techniques. By integrating Stable Diffusion XL, ControlNet, and LoRAs, Fooocus creates an optimized environment for high-quality image synthesis.
Experimenting with the different settings, styles, and models allows users to take full advantage of Fooocus. The application stands out for its ease of use and automatic optimizations, making it accessible even for beginners while enabling high-quality AI-generated images.
